11.15.2012

Sammy is my little buddy who follows me around everywhere and talks all about everything that I'm doing. The other day we were sitting next to each other and he pulled out this little trick and had me laughing out loud.
I have no idea how he figured it out, or where he saw it, but I just love his cute little sense of humor!

8.10.2012

Handmade Chevron Chenille....

I just wanted to show how cute this blanket turned out!


 I used the same method that I shared in my tutorial the other day, but instead of sewing straight lines, I just followed the chevron pattern and cut the chenille using scissors. It took forever, but I love how it turned out!


8.03.2012

Our New House and the Thief

This is another post that I wrote last year and never got around to posting... but it's definitely something I'd like to remember ;) (Dani, remember this??? just have to laugh)

 As most of you know, we just bought our first home!!!!! We are over the moon excited and can't wait to settle in. Today was Closing day, so I had to drive from Columbus to Indianapolis and back. I packed the car full of our art work, lamps and other things that I didn't want to send in the moving truck. I left about 15 mins later than I wanted to (of course :p ) and was stressed and rushed. After I finally calmed down and had been on the road for about 30 mins I was struck with the thought that I needed to check my purse just to make sure my wallet was there. It was the one thing I actually needed for the closing, so maybe I should make sure I have it? I almost didn't, since I had purposefully and memorably checked that it was there just before bed. I started rummaging through my purse but I couldn't feel my wallet anywhere. I thought, "I'll just call Dani (my sister came out to help, BLESS HER!) and ask her if she can see it anywhere in the house, just in case " She looked all around and asked Daniel if he had seen it. "Nope". I figure if it's not somewhere easily seen it must be lurking in the depths of my purse or car so I pull over at a gas station to search. With each moment that passes I get a little more anxious until my sister calls. I can tell she's not too thrilled with what she has to tell me.
Dani:     "Daniel is so dead."
Me:       "Uh-oh, what did he do?"
Dani:     "He hid it."
Me:       "What??? You're kidding right?"
Dani:     "Daniel, go get it........ yep, here it is. He hid it."
Me:        "What in the heck was he thinking??" (as I'm starting to tear up)
Dani:      "He thought he was being funny.... I guess"
Me:         ":Sigh: Put him on the phone."
Daniel:    "giggle giggle, Hi Mommy! giggle giggle giggle I've got your pink purse! giggle giggle I hid          it, I hid it Mommy, somewhere you'd never find it!"
Me:        "Why in the world did you hide my wallet?!?!"
Daniel:     "I was just being funny Mommy. It's pretty funny, huh? That was a good joke!"
  (I'm sure you can imagine the rest of the conversation.... just insert a few empty threats and a lot more giggles and you get the gist. ;)

So I turned around and drove as quickly as possible (well as quickly as I could without getting a ticket, that would have been bad news in the mental state I was in). When I got to the apartment Daniel sheepishly brought out my wallet and I was off.... again. When I FINALLY arrived (after driving for hours and getting lost in Indianapolis) I was 40 mins late to our closing and there were 6 (!) people waiting for me. (I didn't realize there would be that many people!) When I explained we all had a good chuckle and they were all super nice about it. We signed and signed and signed and after about 20 mins we were home owners! Bryan had to zip off to work so we didn't really get to celebrate, but we were so excited! I drove over to the house with my new set of keys, unloaded the van and just sat for a minute, reveling in our new home!

8.02.2012

Handmade Chenille Blankets...

This is a post I wrote a while ago and never posted... It's for my sister Dani who is always asking for tutorials on stuff I've made. Here you go!


These are super easy to make (although time-consuming) and so gorgeous!!! I've made chenille backed bibs for a while now, (my FAVORITE bibs because they are so thick and the front fabric puckers beautifully when they are washed) but the $13+ a yard was way too expensive to use it on any of the bigger projects. (and this method makes a much fuller Chenille, which I love) I have found it in the remnant bins a few times and always snatch it up, which is much cheaper, but again, not great to make blankets with. So I struck out on my own and made few chenille blankets. The first one I made, I just used material from my stash. I wanted it to be sturdy for outdoor use, so I chose denim for the top layer. Then I used three layers of flannel layered underneath. When I use a thinner fabric for the top layer of the blanket (not outdoor, home decor, or denim fabric) I add another layer of flannel directly under the top layer. This additional layer does not end up as part of the Chenille, but is meant to stabilize and strengthen the top layer.  Lay each piece of fabric on top of one another. It doesn't really matter which way the fabrics lie, as long as the top piece is facing out. (so that the pattern can be seen once the blanket is finished) Make sure they are all smooth, with no wrinkling or bubbles. At this point, I like to safety pin them in place every 4 inches or so. You can also use basting spray, or basting stitches to keep it all in place if you like. Once everything is in place, I put a long strip of masking tape from one corner diagonally to the other. This gives me a straight line to start sewing off of. Once you've got your first full line of stitching, the rest is easy-peasy! Use the first line as your guide for the next, etc etc etc. I just space them as far apart as the width of my sewing machine foot.
As you go along, you'll notice that the part of the blanket you've already sewn is all over the place and in your way. Roll it up like so:

 and keep rolling as more fabric is stitched. When you reach the edge of your blanket, you'll notice that only half of it is done. (hopefully you've noticed it before now!) Just turn the blanket upside down and repeat what you've already done with the first half. When you're done, it'll look like this: a nice pin stripe!

Flip the blanket over so that the flannel is facing up. You can either use a special chenille cutter or a pair of scissors . I really prefer the chenille cutter, as there is no way you could accidentally cut your top layer and it cuts the fabric evenly, so the chenille is the same length all over. You can pick up one of these tools at any fabric store for about $15. (this would be a great item to use a coupon on!) The plastic guide (or bottom side of your scissors) goes in between your top layer(s) and the fabric you want to make into Chenille. Slide it all the way through the channel in between your lines of stitching. Repeat until you've cut the whole blanket.


This is what your blanket should now look like:


Square up your blanket by checking the edges and trimming them so they are all even every layer goes all the way to the edge.  (note: "squaring" a quilt does not mean you have to make it an actual square! Just that you make sure all of the sides are straight and clean ;)  ) 
If you want rounded corners and you:
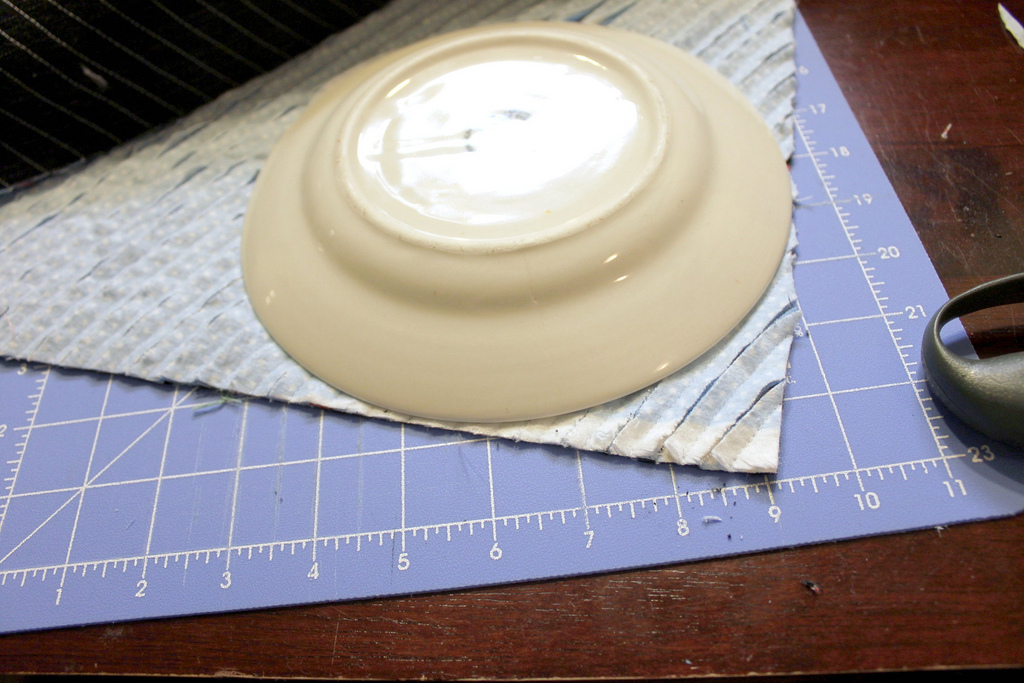
 a.) are willing to cut your binding on the bias, or b.) will buy bias cut binding to use; then garb a small salad plate (or something else around this size) and trim around it with your rotary cutter. (you could also  trace the plate with a pen and cut it with scissors. Just make sure you cut INSIDE your markings so that you don't chance an ink bleed when you wash it)

Here comes the fun part, making it bloom! Stick it in the washer, (by itself, because it's going to shed like crazy!) then put it through the dryer twice, cleaning the lint trap in between cycles.  When you pull it out, it should look like this! So cozy, no?


Next cut or purchase your binding and finish those edges! (Here is a great binding tutorial. Note that because you are using rounded corners and bias cut binding you don't need to worry about mitered corners, which makes it a ton easier!)


8.01.2012

2nd Grade!

I'm a huge slacker, I know. We've survived our first year of residency and we've had a few things going on, lol. So, hopefully all three of you can forgive me? ;)
But, I guess it's REALLY time for me to blog again since we now have a 2nd grader!!!
School started earlier this year to accommodate an "expanded schedule." In other words, we get longer breaks during the year and a shorter summer. I think I'm a fan, but only time will tell. Daniel was so excited to get back to school and see so many of his friends again.


I'm already sensing what a  challenge it will be to keep Sammy busy on my own! He travels at a million miles a minute! We're keeping our fingers crossed for a great year!


Related Posts with Thumbnails